For the first time, in a long time, I entered the Vintaj Monthly Design Challenge. I was late sending in my photo, but the kind folks at Vintaj squeezed me in under the wire! This month's theme is "Storybook" and the Vintaj Art Bead Partner is Erin Prais-Hintz of Tesori Trovati. You might remember her name from my previous post - she's the creator of "simple truths" pendants and beads, and made the focal pendant in my (now published) "Make a Wish" necklace!
After being published in Bead Trends, Erin kindly offered me a pendant as a gift. Of course, I took her up on her offer! The pendant I chose reads "write your own happy ending", and is one of the many items she made to fit Vintaj's "Storybook" theme. (check out her etsy shop for more beautiful pendants).
When I saw the pendant, I immediately liked the message. I like thinking I can make my own happy ending, it's very hopeful.
The rose on the pendant is more of a brownish red, and matched some carnelian beads I had in my stash. I also wanted to bring out some of the green in the stem of the rose, so I found the lumpy etched lampwork bead. I wish I could remember who made it. I do know I bought it at Beadfest years ago. I also found some czech beads that were orangy red, with a greenish picasso finish - perfect! And of course, Vintaj bead caps, chain and findings.
If you are so inclined, please visit the Vintaj Monthly Challenge and vote for my design.
One reason I was late entering the challenge is....I got a new camera!! It's just a point and shoot style camera. I will learn about photography some other time. I really needed to take some photos, and they look pretty good to me.
My name is Cynthia and I live in Bucks County, PA. I love beads and jewelry, especially Antique and Vintage jewelry. I design vintage inspired jewelry, but with a modern twist. I like to think of them as heirlooms of the future.
Tuesday, May 08, 2012
Tuesday, April 17, 2012
My first magazine page!
Well, I received my necklace back from Bead Trends this week. I'm glad to have it back. I can now wear it, and then whip out the magazine! The photo is slightly bigger than real life, and the photography is really fantastic! Here's my first-ever magazine page!!!!
And, the cherry on top is that this picture also appeared on the Vintaj blog!
I'd like to thank Erin Prais-Hintz, for creating the beautiful focal!!
And, the cherry on top is that this picture also appeared on the Vintaj blog!
I'd like to thank Erin Prais-Hintz, for creating the beautiful focal!!
Tuesday, April 10, 2012
April showers....we need rain!
Well, I thought (for half a second) that maybe my camera had "healed thyself". But a closer look at the photos on the computer screen reveals it was wishful thinking. You know, on the tiny screen on the camera, all the photos looked pretty good, but almost all are fuzzy.
But heck, I'm not gonna let that stop me from showing you some more of my flowers. I apologize in advance if they give you a headache, trying to bring them in focus.
I must find the time to shop for and buy a new camera! Does anyone out there LOVE their camera? I'm seeking your advice....
This photo is the "straight on" shot. It shows the pretty little flower in the center. These flowers I'm making are in layers. Bottom layer is a piece of Vintaj filigree, then a large enameled daisy, then an enameled cage-like thing, then the small flower, and topped with a pale blue Swarovski.
But the "side shot" tells another side of the story. I bent some starburst type flowers to try to replicate some sort of tropical flower (the "cage-like" thing). I don't know what it's supposed to be, but I like it! They are slightly irregular and funky. And I like the dimension it gives my flowers.
Then I took it one step further. These are more like a 3-D objects that resemble a flower. They sort of remind me of Fuchsia, or a Japanese lantern. The purple and green one really has that lantern shape!
I bent more of the starburst flowers straight up from the center, to make them look like something you might find in the center of a flower. I was thinking of a Stamen. These don't really look like that, but that's what I was going for.
I wish I had the words to express how much I love enameling all the components, and how much I love assembling the components, and how much I love the results. I love that every time I turn on the torch, I'm never quite sure what I'll get. I guess if I wanted to make 10 things the same I'd be cursing. But I love the imperfections, and the surprises.
Other topics:
I am going to Beadfest Spring this Friday. I know the ONE booth I MUST visit is Barbara Lewis' Painting with Fire. I am actually starting to run out a couple colors of enamel already. Plus, I want to add some colors to my collection, and pick someone's brain about a couple things I haven't figured out yet.
I'm also participating in Cindy Wimmer's Button Swap. I think I'm more excited to send my buttons to my partner than I am to receive the package from her. Of course, all that will all change when I actually get my package and squeal with excitement! Can't wait!!!!
But heck, I'm not gonna let that stop me from showing you some more of my flowers. I apologize in advance if they give you a headache, trying to bring them in focus.
I must find the time to shop for and buy a new camera! Does anyone out there LOVE their camera? I'm seeking your advice....
This photo is the "straight on" shot. It shows the pretty little flower in the center. These flowers I'm making are in layers. Bottom layer is a piece of Vintaj filigree, then a large enameled daisy, then an enameled cage-like thing, then the small flower, and topped with a pale blue Swarovski.
But the "side shot" tells another side of the story. I bent some starburst type flowers to try to replicate some sort of tropical flower (the "cage-like" thing). I don't know what it's supposed to be, but I like it! They are slightly irregular and funky. And I like the dimension it gives my flowers.
Then I took it one step further. These are more like a 3-D objects that resemble a flower. They sort of remind me of Fuchsia, or a Japanese lantern. The purple and green one really has that lantern shape!
I bent more of the starburst flowers straight up from the center, to make them look like something you might find in the center of a flower. I was thinking of a Stamen. These don't really look like that, but that's what I was going for.
I wish I had the words to express how much I love enameling all the components, and how much I love assembling the components, and how much I love the results. I love that every time I turn on the torch, I'm never quite sure what I'll get. I guess if I wanted to make 10 things the same I'd be cursing. But I love the imperfections, and the surprises.
Other topics:
I am going to Beadfest Spring this Friday. I know the ONE booth I MUST visit is Barbara Lewis' Painting with Fire. I am actually starting to run out a couple colors of enamel already. Plus, I want to add some colors to my collection, and pick someone's brain about a couple things I haven't figured out yet.
I'm also participating in Cindy Wimmer's Button Swap. I think I'm more excited to send my buttons to my partner than I am to receive the package from her. Of course, all that will all change when I actually get my package and squeal with excitement! Can't wait!!!!
Labels:
Barbara Lewis,
Button Swap,
Cindy Wimmer,
Painting with Fire
Tuesday, March 27, 2012
I'm published!!!!!!!!!!!!!!!!!!!!!
I know there are many jewelry designers out there that are in magazines all the time, and would yawn at my news. But, this is my first time! The magazine(s) arrived in yesterday's mail! I swear, it was better than when I open the mailbox to find multiple etsy packages (and you know how good that is!!). There they were - my copies of Bead Trends April edition. I have been looking forward to April since mid-winter, when I sent my necklace in. I'm not sure what the rules are, so I'll just show you my name in print! I'm a little excited (just a little bit - like really a lot!)
![]() |
| Photo is from my ipod |
Friday, March 16, 2012
Spring is Coming!!!!!
I do not understand why, after such a mild winter, I have such a bad case of Spring fever. Normally, after the drudgery of a hard winter, Spring is such a welcomed change. But this year, we barely got any snow or ice at all. So, it is unexplainable!
Maybe it's because I've been making tons of enameled flowers!! Look!
I'm going to display these at the shop on the green moss and moss covered "stones" in these photos. The moss is in a flower pot saucer!
I. Can. Not. Wait. For. Spring!!!!!
Maybe it's because I've been making tons of enameled flowers!! Look!
![]() |
| Large blue flower, medium violet flower and a small filigree bead - enameled by moi! |
![]() |
| An orange flower with a copper green bead cap - on a Vintaj butterfly. |
![]() |
| This is a crazy one! Green pedals with a small orange flower and a smaller blue flower. |
![]() |
| This angled shot shows the 3-d aspect of this "flower" |
![]() |
| Sorry for the crappy photo, but here's a peek at some of the other flowers I've been making! |
![]() |
| And just in time for St. Patty's - a shamrock! (this one is terribly out of focus SORRY!) |
I'm going to display these at the shop on the green moss and moss covered "stones" in these photos. The moss is in a flower pot saucer!
I. Can. Not. Wait. For. Spring!!!!!
Wednesday, February 29, 2012
Challenge of Music blog hop
Today is the day for Erin Prais-Hintz's Challenge of Music blog hop. I must admit, I signed up for this challenge with a little apprehension. I wasn't sure if I could be inspired by music to make jewelry.
I really started listening to some of my favorite artists and songs. I originally thought I'd use a song by Dave Carter and Tracy Grammer, because his songs are like little stories, with vivid imagery.
But as I started to look around online for components, I kept hearing "Home" by Daughtry in my head. Unless you've been living under a rock for the last 5 years or so, you probably have at least heard of them. I love "Home" (this link is to a youtube video), Daughtry's second hit single. I listen to Daughtry while I work out at the gym, so I've heard all their songs repeatedly. I know every lyric by heart....
"I'm going home,
Back to the place where I belong,
And where your love has always been enough for me."
I thought about "home" and what it could mean...
A house to a person...
A nest to a bird...
Family.
I started buying components for "home", each one more perfect than the next. So, in no particular order, I'll show you my homes....
This first one features components from Captured Moments. I fell in love with the egg connector, and the bird nest focal. I am sorry to say that my camera was acting up for these photos, but you get the idea (they really do not have that pinkish glow)! I added some carved bone beads that matched the ceramics pieces perfectly, and a wire bead that reminded me of a nest. Finished off with some Vintaj bead caps and wire.
The matching earrings are made with flower connectors. They came as a set with the one egg connector from the necklace.
Next...
These wooden birdhouses are from ARTchix Studios. How cute are they?? When I saw them on the website, I immediately knew I wanted to layer them, so I also bought plain houses without the window, to use as the back layer. Of course, once things are in your hands, it doesn't always work out how you planned. My thought was to put a vintage image of a bird on the back layer to show through the window, add some wire or other fibers in the middle, and the birdhouse on the top. Let's just say that I don't have all the needed skills, or materials! I made the wire nest and eggs to hang behind, and I'm happy with it (I still did "layers").
The blue beads are faceted czech glass in 2 sizes. I also folded an antique brass leaf bail to use at the top of my house, just to give it a little something extra. Added in some antique brass bead caps and Vintaj chain too.
This is the focal, behind the scenes. You can see the wood burn marks on the back. It smells like a fire in the fireplace. I love that smell.
The earrings are smaller houses. I hung the little "egg" in the front. I thought they might not show well if I hung them on the back of the earrings.
Last, but not least, is my third house (This is turning into "The Three Little Pigs" lol...)
Anyway. This raku house is from Oscar Crow on etsy. There are some really interesting things in that shop! If any one ever hosts a challenge for jewelry with baby heads, I'll be ahead of the game. (check out the shop, you'll see).
Anyway. I love this little house, with it's red door and window. I sat and stared at it for a little while. Somehow, it occurred to me to make a cumulus cloud over the house. I bent the cloud out of 20g wire, and hammered it, so it will keep it's shape. As I was fussing with the cloud, I happen to see the orange-red key in the corner of my eye. This key has been on my messy desk for about 6 months. It's just an old key that I smeared with red "Rub-N-Buff". I found some czech picasso glass beads that match and bent some bead caps to fit over them. And of course, Vintaj chain.
That's it for me. Thank you Erin, for hosting another fun challenge!
Please visit the rest of the brave participants, or go to Erin's blog!!
Erin Prais-Hintz
I really started listening to some of my favorite artists and songs. I originally thought I'd use a song by Dave Carter and Tracy Grammer, because his songs are like little stories, with vivid imagery.
But as I started to look around online for components, I kept hearing "Home" by Daughtry in my head. Unless you've been living under a rock for the last 5 years or so, you probably have at least heard of them. I love "Home" (this link is to a youtube video), Daughtry's second hit single. I listen to Daughtry while I work out at the gym, so I've heard all their songs repeatedly. I know every lyric by heart....
"I'm going home,
Back to the place where I belong,
And where your love has always been enough for me."
I thought about "home" and what it could mean...
A house to a person...
A nest to a bird...
Family.
I started buying components for "home", each one more perfect than the next. So, in no particular order, I'll show you my homes....
This first one features components from Captured Moments. I fell in love with the egg connector, and the bird nest focal. I am sorry to say that my camera was acting up for these photos, but you get the idea (they really do not have that pinkish glow)! I added some carved bone beads that matched the ceramics pieces perfectly, and a wire bead that reminded me of a nest. Finished off with some Vintaj bead caps and wire.
The matching earrings are made with flower connectors. They came as a set with the one egg connector from the necklace.
Next...
These wooden birdhouses are from ARTchix Studios. How cute are they?? When I saw them on the website, I immediately knew I wanted to layer them, so I also bought plain houses without the window, to use as the back layer. Of course, once things are in your hands, it doesn't always work out how you planned. My thought was to put a vintage image of a bird on the back layer to show through the window, add some wire or other fibers in the middle, and the birdhouse on the top. Let's just say that I don't have all the needed skills, or materials! I made the wire nest and eggs to hang behind, and I'm happy with it (I still did "layers").
The blue beads are faceted czech glass in 2 sizes. I also folded an antique brass leaf bail to use at the top of my house, just to give it a little something extra. Added in some antique brass bead caps and Vintaj chain too.
This is the focal, behind the scenes. You can see the wood burn marks on the back. It smells like a fire in the fireplace. I love that smell.
The earrings are smaller houses. I hung the little "egg" in the front. I thought they might not show well if I hung them on the back of the earrings.
Last, but not least, is my third house (This is turning into "The Three Little Pigs" lol...)
Anyway. This raku house is from Oscar Crow on etsy. There are some really interesting things in that shop! If any one ever hosts a challenge for jewelry with baby heads, I'll be ahead of the game. (check out the shop, you'll see).
Anyway. I love this little house, with it's red door and window. I sat and stared at it for a little while. Somehow, it occurred to me to make a cumulus cloud over the house. I bent the cloud out of 20g wire, and hammered it, so it will keep it's shape. As I was fussing with the cloud, I happen to see the orange-red key in the corner of my eye. This key has been on my messy desk for about 6 months. It's just an old key that I smeared with red "Rub-N-Buff". I found some czech picasso glass beads that match and bent some bead caps to fit over them. And of course, Vintaj chain.
That's it for me. Thank you Erin, for hosting another fun challenge!
Please visit the rest of the brave participants, or go to Erin's blog!!
Erin Prais-Hintz
Wednesday, February 22, 2012
Enameled Flowers and Keys!
Now that the evil camera is cooperating somewhat, I took some photos of the flowers I enameled over the weekend. I really *L*O*V*E* them! Take a look, I think you'll agree!
This is all of them in my crystal dish.
These are the larger flowers. They range in size, up to about 2 inches! I love that the results are, more often than not, unpredictable. The 2 orange flowers were enameled with the exact same enamels!! The lower one almost looks purple in the center.
Here are the larger flowers with some smaller flowers, as I might layer them. I'm planning on layering them with a piece of Vintaj filigree as the bottom layer, to make pendants.
And, maybe not as fantastic, but I still love them, are keys, and a heart, and a butterfly. The littlest keys are only 5/8" long. So tiny and cute!
So, that's it for now.
I took more pictures last night, but they are for Erin's Challenge of Music, reveal /blog hop on 2/29/12, so please come back then.
This is all of them in my crystal dish.
These are the larger flowers. They range in size, up to about 2 inches! I love that the results are, more often than not, unpredictable. The 2 orange flowers were enameled with the exact same enamels!! The lower one almost looks purple in the center.
Here are the larger flowers with some smaller flowers, as I might layer them. I'm planning on layering them with a piece of Vintaj filigree as the bottom layer, to make pendants.
![]() |
| LOVE!!! |
So, that's it for now.
I took more pictures last night, but they are for Erin's Challenge of Music, reveal /blog hop on 2/29/12, so please come back then.
Monday, February 20, 2012
I have some pictures to prove it!
I continue to battle my camera. It has been winning lately. It just doesn't work right, most of the time. I really thought it was the batteries, but I think now, more specifically, it's a power issue. Maybe the batteries are not the cause? I have a few more things to try before I chuck it, and buy a new one (did you hear that, camera?? you better start behaving or you're history!)
Anyway, when it was having a good day, I did get some photos of some enameled beads! These pictures were taken a couple weeks ago, before I got my shipments of more enamel colors. So, orange, and green, and aqua, and blue. This bowl was about 4-5 hours of bead enameling - not bad!!
A closer view of the beads....you can see I might have gotten too much enamel on the bottom orange bead. It's holes all filled in!
This photo is a little blurry, but the beads are still pretty!
pretty colors!!
You can stop licking the screen, they do not taste good, trust me ;-)
I've also been embossing!! I got the Vintaj Big Kick for Christmas and have been quietly embossing to my heart's content. I have not tried putting any paint, ink, or other color on them. I rather like the look of Vintaj brass, so, for now, they are naked.
I split them up into groups, for your viewing pleasure!
These are already earrings!
Just pendants - love that wide-eyed owl at the bottom!
And more pendants!
And Vintaj has more designs of embossing folders coming out, so, as soon as they hit the Vintaj website I'll be adding them to my repertoire.
Anyway, when it was having a good day, I did get some photos of some enameled beads! These pictures were taken a couple weeks ago, before I got my shipments of more enamel colors. So, orange, and green, and aqua, and blue. This bowl was about 4-5 hours of bead enameling - not bad!!
A closer view of the beads....you can see I might have gotten too much enamel on the bottom orange bead. It's holes all filled in!
This photo is a little blurry, but the beads are still pretty!
pretty colors!!
You can stop licking the screen, they do not taste good, trust me ;-)
I've also been embossing!! I got the Vintaj Big Kick for Christmas and have been quietly embossing to my heart's content. I have not tried putting any paint, ink, or other color on them. I rather like the look of Vintaj brass, so, for now, they are naked.
I split them up into groups, for your viewing pleasure!
These are already earrings!
Just pendants - love that wide-eyed owl at the bottom!
And more pendants!
And Vintaj has more designs of embossing folders coming out, so, as soon as they hit the Vintaj website I'll be adding them to my repertoire.
Wednesday, February 15, 2012
A Cautionary Tale
WARNING: yukky photo below
I've been having so much fun torch fire enameling. I've got a big mess of beads to show for it, and have started putting them into some jewelry designs. I will take pictures of them, but this post is not about the beads, or the jewelry.
Up until this weekend, I could proudly say that I had not burned myself yet! But, now I can't say that!
I am always very respectful of the torch, especially when it's lit. I always make sure that my hands stay well away from the flame. I hold the jar of enamel powder in my left hand to tilt it (coming from the left side of the torch), and hold the bead and mandrel in my right hand (on the right side of the torch). I always keep my hands low, to avoid the flame. Often, I turn off the torch between beads, to save the gas (especially since MAPP has been recalled, and you can't buy it right now).
But on Sunday, I was putting a lid on one of my jars. The torch was not lit, so I think my guard was down. I guess it is my habit to bring a jar closer to my body, to get the lid on tighter, and that is when I touched the hot torch. It was a half a second, but it burned me pretty good.
It doesn't hurt anymore, but, it's look is changing.
Yesterday, it looked like the Chesapeake Bay!!
Today, it looks more like a Chinese Dragon! Do you see it?
Overall, it reminds me of Zombie flesh! yuk :-(
Mercifully for you, I took this photo with my ipod, with one hand, so it's blurry.
I've been having so much fun torch fire enameling. I've got a big mess of beads to show for it, and have started putting them into some jewelry designs. I will take pictures of them, but this post is not about the beads, or the jewelry.
Up until this weekend, I could proudly say that I had not burned myself yet! But, now I can't say that!
I am always very respectful of the torch, especially when it's lit. I always make sure that my hands stay well away from the flame. I hold the jar of enamel powder in my left hand to tilt it (coming from the left side of the torch), and hold the bead and mandrel in my right hand (on the right side of the torch). I always keep my hands low, to avoid the flame. Often, I turn off the torch between beads, to save the gas (especially since MAPP has been recalled, and you can't buy it right now).
But on Sunday, I was putting a lid on one of my jars. The torch was not lit, so I think my guard was down. I guess it is my habit to bring a jar closer to my body, to get the lid on tighter, and that is when I touched the hot torch. It was a half a second, but it burned me pretty good.
It doesn't hurt anymore, but, it's look is changing.
Yesterday, it looked like the Chesapeake Bay!!
Today, it looks more like a Chinese Dragon! Do you see it?
Overall, it reminds me of Zombie flesh! yuk :-(
Mercifully for you, I took this photo with my ipod, with one hand, so it's blurry.
Tuesday, January 31, 2012
Andrew's "Jonquil" challenge reveal and blog hop
You all know Andrew Thornton, don't you?
Well, this challenge was a long time in the making. I was thrilled when I was able to snag one of Andrew's kits (back on 11/25/11). Not only was there a "mystery component", but the entire kit was a mystery when I hit the "buy" button. Andrew offered the kits as a pre-sale, sight unseen. The "mystery component" is a beautiful pendant, which I used for my focal. I'm not sure if Andrew made it, or his sister Cynthia (love her name, BTW). But I really like it! I used just about all the major beads from the kit. There was a baggie of seed beads with some small to medium beads mixed in. I used some of those too. I'm not a "seed beader", so I don't use seed beads in my jewelry very often. I added the filigree ring, to create a toggle clasp at the front of the necklace. I used the chain from the kit, but I doubled it up, to give it a bit more weight.
Here's a close up of the beautiful "mystery component"....fabulous!!!
Here's the list of blog hop participants:
Well, this challenge was a long time in the making. I was thrilled when I was able to snag one of Andrew's kits (back on 11/25/11). Not only was there a "mystery component", but the entire kit was a mystery when I hit the "buy" button. Andrew offered the kits as a pre-sale, sight unseen. The "mystery component" is a beautiful pendant, which I used for my focal. I'm not sure if Andrew made it, or his sister Cynthia (love her name, BTW). But I really like it! I used just about all the major beads from the kit. There was a baggie of seed beads with some small to medium beads mixed in. I used some of those too. I'm not a "seed beader", so I don't use seed beads in my jewelry very often. I added the filigree ring, to create a toggle clasp at the front of the necklace. I used the chain from the kit, but I doubled it up, to give it a bit more weight.
Here's a close up of the beautiful "mystery component"....fabulous!!!
Here's the list of blog hop participants:
Alice Bavaud will have pieces on Andrew Thornton's blog
Thanks to Andrew for the beautiful kit!! Enjoy the eye candy!
Wednesday, January 25, 2012
Beaded Humor!!
OK! If you are not reading this blog, you are really missing out on some really funny stuff. Some of the posts will make you laugh out loud. I swear!!
I was so inspired by Sylvie and her funny "Hey girl" posts, I've made one of my own, using a photo of my husband!
I had to change it to "Hey Honey", because my man would never call me "girl".
And the photo is my husband, from the neck up. I photoshopped this a couple years ago, as a joke. Now it's doubly funny!! I will leave the identity of "the body" a mystery, to protect the innocent.
The file is big, but it's worth the wait!
I was so inspired by Sylvie and her funny "Hey girl" posts, I've made one of my own, using a photo of my husband!
I had to change it to "Hey Honey", because my man would never call me "girl".
And the photo is my husband, from the neck up. I photoshopped this a couple years ago, as a joke. Now it's doubly funny!! I will leave the identity of "the body" a mystery, to protect the innocent.
The file is big, but it's worth the wait!
Saturday, January 14, 2012
Secret Snowflake Challenge
Michelle Mach is hosting the Secret Snowflake challenge. She secretly commissioned the ceramic focal and links from Mellisa at Chinook Jewelry. As soon as I saw the Chinook focal, I knew I wanted in. There were other beads in the kit, but the kits ran out, so I bought the focal and links directly from Chinook. (today's lesson: The early bird gets the........kit!)
So, with just the ceramic parts in hand, I dove into my stash. I found some lovely blue Czech crystal rondelles that matched beautifully. I made my earrings first. If you look closely, you will see, as with many handmade things, one of the holes in the one focal was a little farther away from the edge. (this is truly the beauty of handmade!) My small jumprings did not fit and I did not want to use large jumprings, so I wire wrapped the crystal rondelles, sort of like a briolette drop.
On to the necklace.... When I received my package from Chinook, and I saw the focal, I thought, "where's the challenge?". With a focal so pretty, it was hardly a "challenge".
Looking further in my hoard of beads, I found some AB Crystal faceted rounds, and the Vintaj "sunflower" charm. I thought the sunflower charm rather looked like a snowflake, so I decided to use it. For the link along the necklace, I snipped off the little hole off the charm (and filed it smooth). I used another charm on the pendant, and added some crystals to the bottom of it.
Seriously, look at the glaze on the focal!!!
Up close and personal...
Please visit all the participants, and be sure to leave a comment!!
(the names without links can be found at Michelle Mach's blog)
So, with just the ceramic parts in hand, I dove into my stash. I found some lovely blue Czech crystal rondelles that matched beautifully. I made my earrings first. If you look closely, you will see, as with many handmade things, one of the holes in the one focal was a little farther away from the edge. (this is truly the beauty of handmade!) My small jumprings did not fit and I did not want to use large jumprings, so I wire wrapped the crystal rondelles, sort of like a briolette drop.
On to the necklace.... When I received my package from Chinook, and I saw the focal, I thought, "where's the challenge?". With a focal so pretty, it was hardly a "challenge".
Looking further in my hoard of beads, I found some AB Crystal faceted rounds, and the Vintaj "sunflower" charm. I thought the sunflower charm rather looked like a snowflake, so I decided to use it. For the link along the necklace, I snipped off the little hole off the charm (and filed it smooth). I used another charm on the pendant, and added some crystals to the bottom of it.
Seriously, look at the glaze on the focal!!!
Up close and personal...
Please visit all the participants, and be sure to leave a comment!!
(the names without links can be found at Michelle Mach's blog)
- Alice (Alice Dreaming)
- Chris (beadjewelry.net)
- Christa (Adventures of One Beady Woman)
- Crystal (Here Bead Dragons)
- Cynthia (Cynth's Blog)**You are here**
- Dawn (Morning Glory Beading)
- Donetta (Simply Gorgeous)
- Erin A.
- Jennifer (JenniferJW)
- Jennifer (Jewelry, Art and Life)
- Kari W.
- Kate (We Can Make That at Home)
- Kay (Palm Coast Art)
- Linda (Lindy's Designs)
- Lisa C. (A Bead a Day)
- Lisa (Inspired Adornments)
- Mary (MLH Designs)
- Michelle (Beads & Books)
- Michelle B.
- Millie (AMM Jewelry)
- Norma (Moonlit Fantasies)
- Pam (The Crazier Sister)
- Rebecca J.
- Renetha (Lamplight Crafts)
- Rosemarie (Gem Rose Designs)
- Shannon (Falling into the Sky)
- Susan (Bead Inspired)
- Therese (Therese's Treasures)
- Therese (DG Enterprises)
Wednesday, January 11, 2012
Was it the batteries?
I finally remembered to buy new batteries for my camera. I loaded them in, and my camera had the same problem. (The lens was not seeing clearly - dark shadows and distorted image). Rats!! Now I need a new camera! I tried to go into the settings, like I know what I'm doing. Nothing!
But then, all of a sudden, the picture looked normal. Did I fix it? Was it the batteries? Did I change a setting? Or do I really need a new camera? Time will tell. In the meantime, here's what I've been dying to show you.
I have been hoarding these Diane Hawkey beads for probably 4 or 5 years. I bought them to make Christmas/ holiday necklaces, but never got around to it, until this year.
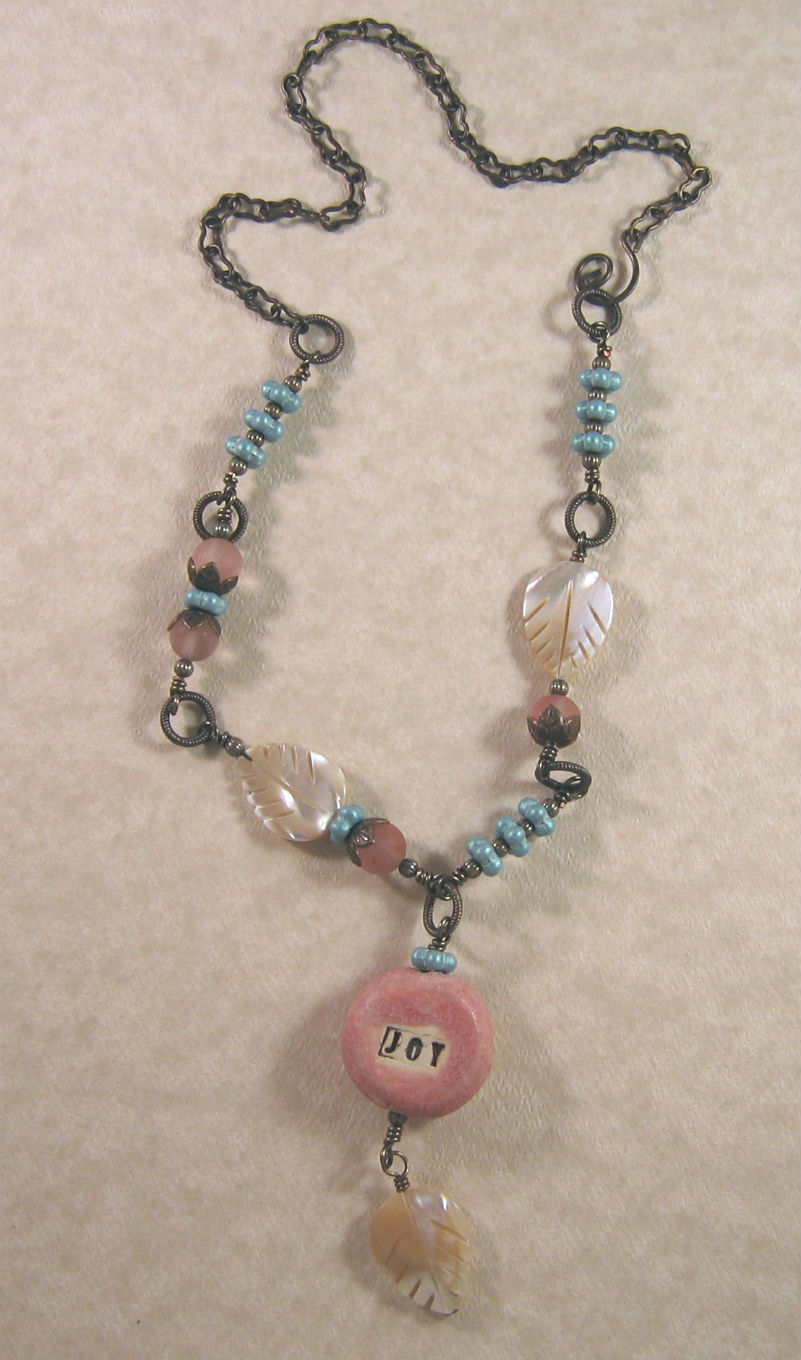
The first one, "Joy", has a pink and aqua color palette. I wanted to be able to wear it year round (in case I am feeling joyous). I used aqua blue Czech flower spacers, Mother of Pearl leaves, Strawberry Quartz "Beach Glass" rounds, and, of course, Vintaj brass.
A closer look...
An even closer look....
The next focal bead, "Peace", is green, which would seem more Christmas-y. I tried to give it a "woodland" vibe, with tan and Vintaj. I used green Czech faceted rondelles, tan ceramic beads and some "speckled egg" seed beads (which are one of my favorite seed beads to use).
This focal is really fabulous up close!!
Peace to all - all year long!!
I've got a couple more photos to post. There's Michelle Mach's Snowflake challenge, which I'll post on Friday. The reveal date is over the weekend, but I can't post over the weekend. I'd rather be early than late.
And I was lucky enough to get in on Andrew Thorton's latest challenge kit - "Jonquil". I need to revisit the reveal date on that one - I'm not sure when it is. I might just go ahead and post my photos early next week.
In my excitement of the camera cooperating, I forgot to shoot photos of all my fabulous enameled beads I made. Hopefully the camera will be in a good mood this weekend!
But then, all of a sudden, the picture looked normal. Did I fix it? Was it the batteries? Did I change a setting? Or do I really need a new camera? Time will tell. In the meantime, here's what I've been dying to show you.
I have been hoarding these Diane Hawkey beads for probably 4 or 5 years. I bought them to make Christmas/ holiday necklaces, but never got around to it, until this year.
The first one, "Joy", has a pink and aqua color palette. I wanted to be able to wear it year round (in case I am feeling joyous). I used aqua blue Czech flower spacers, Mother of Pearl leaves, Strawberry Quartz "Beach Glass" rounds, and, of course, Vintaj brass.
A closer look...
An even closer look....
The next focal bead, "Peace", is green, which would seem more Christmas-y. I tried to give it a "woodland" vibe, with tan and Vintaj. I used green Czech faceted rondelles, tan ceramic beads and some "speckled egg" seed beads (which are one of my favorite seed beads to use).
This focal is really fabulous up close!!
Peace to all - all year long!!
I've got a couple more photos to post. There's Michelle Mach's Snowflake challenge, which I'll post on Friday. The reveal date is over the weekend, but I can't post over the weekend. I'd rather be early than late.
And I was lucky enough to get in on Andrew Thorton's latest challenge kit - "Jonquil". I need to revisit the reveal date on that one - I'm not sure when it is. I might just go ahead and post my photos early next week.
In my excitement of the camera cooperating, I forgot to shoot photos of all my fabulous enameled beads I made. Hopefully the camera will be in a good mood this weekend!
Subscribe to:
Posts (Atom)